The most often ignored or unknown settings for most beginners often deal with Auto Focus. I often see people accidentally change these settings then wonder why their camera “isn’t focusing properly anymore.” The following info should do away with all the frustration that results from just not knowing how your camera works.
AUTO FOCUS POINTS:
The first most important thing to become familiar with are auto focus points and how to select them. The number of points and where they are situated depends on the make and model of the camera but there are a few typical configurations such as the 9 point system used on most entry to mid-range canon cameras. There is an option to manually select a point or to have the camera decide which point or combination of points to use.
You will typically see something like this in your viewfinder: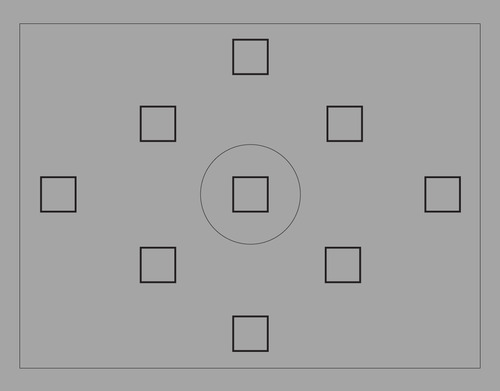
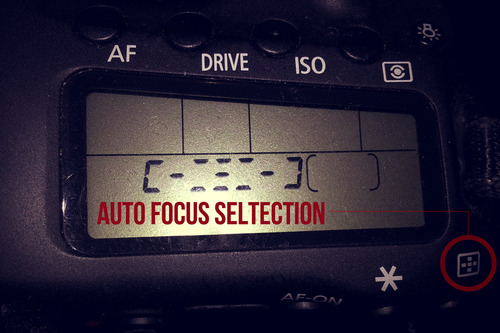
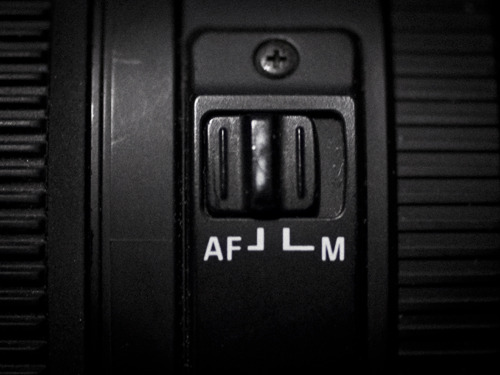
This is the dedicated Auto Focus Point Button on a Canon 60D. Although it may be elsewhere on other models it is labeled with “AF.”
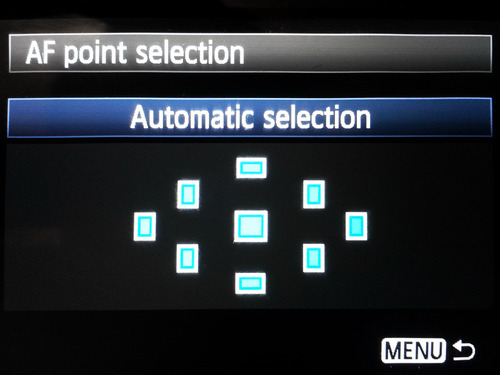
The AF button will take you to the selection screen. The default setting is “Automatic”
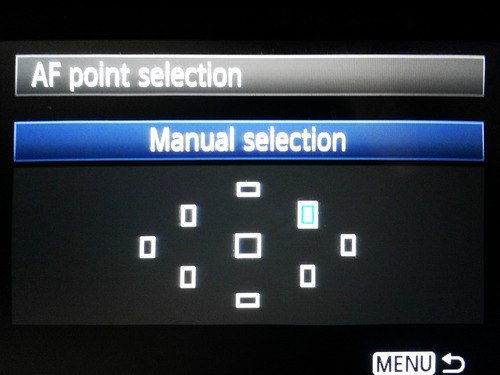
You can then select any point you want with any of the scroll wheels or arrow buttons.
SENSORS:
There are 2 types of focus sensors. They are distinguished by how they are able to focus. Point can focus by finding contrast with vertical lines in a scene or by finding contrast with horizontal lines. Larger max apertures on lenses will allow for more accurate focus. Most cameras will focus with any lens with a max aperture of 5.6 or larger. (there are hacks that will allow for smaller max apertures found on some third party lenses) The reason for larger apertures providing more accuracy is because the focus sensors require a lot of light to be more accurate at detecting contrast.
The vertical line sensor is the most common type. It detects horizontal lines. (once again photography names things so that you can get confused by it opposite meaning, lol.) The other, more accurate type, is the cross type sensor which detects both horizontal and vertical lines in a scene. This type can be typically found at the center point and a few surrounding points in higher end cameras.
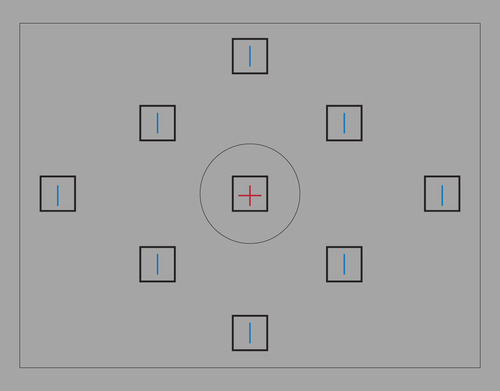
The red crosses are cross type sensors, the blue lines are vertical line sensors.
Of course if you rotate the camera into portrait mode those vertical line sensors will now detect contrast with vertical lines instead of horizontal…
SETTINGS:
Autofocus deals with two settings and of course the Af/Mf switch on the lens. Some lenses let you adjust focus manually while set to auto others do not and attempting to can damage the lens.
01 Auto Focus Modes
The first thing to decide is what mode you should use. There is a setting for use on non moving objects and a setting for tracking moving objects.
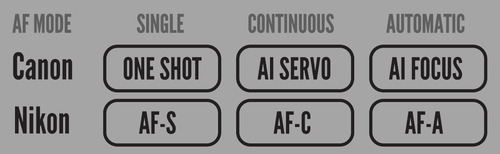
Single shot Mode:
Canon calls it “One Shot” and Nikon calls it “AF-S” others might call it something else. When the shutter is half pressed, this setting focuses on a subject once then holds that focus.
You can put this to use by focusing and re-composing a shot without changing focus. It can be better put to use by combining it with the use of different focus points.
02 Continuous Mode:
Canon calls it AI Servo, Nikon calls it AF-C mode. Both allow constant focusing on selected focus points. This mode is best for moving objects because it continuously tracks an object to re-adjust focus should it’s position change before the shot is taken.
03 Automatic
Sometimes there will be a third setting that will automatically detect which mode to use. This typically doesn’t work very well and it’s better to choose a mode yourself. Canon calls it AI Focus, Nikon calls it AF-A.
SHOOTING:
Now that you know how to use auto focus and a bit about how it works it can really help improve your compositions and how quickly you can prepare yourself to take a shot.
Selecting ONE SHOT mode and combining it with using the center point then quickly recomposing the shot is one way to quickly autofocus on a particular part of a scene. Otherwise you can try to quickly select the point you think will fall over the part of the scene you want in focus. If you want to control of where to focus and avoid out of focus photos it’s best to manually choose your focus point.
Here are some samples of compositions and the points I selected during shooting. With enough practice, you will learn where the sensor will be able to achieve focus as well as which focus point to select for optimal sharp focus.
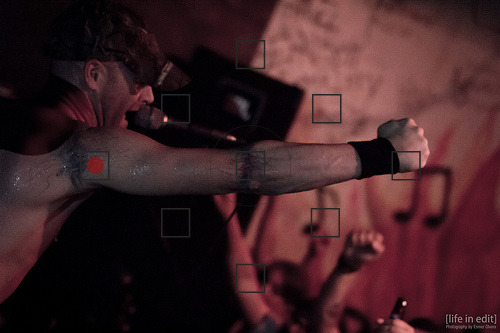
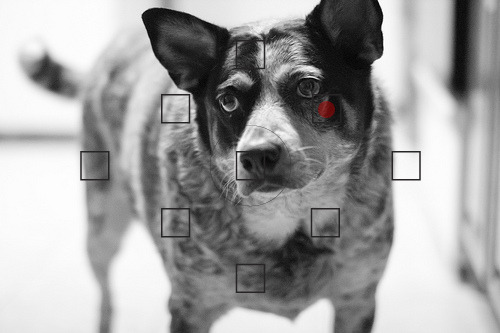
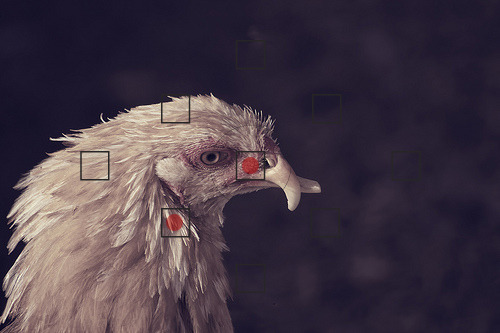
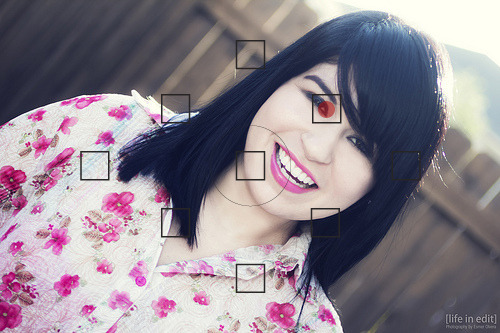
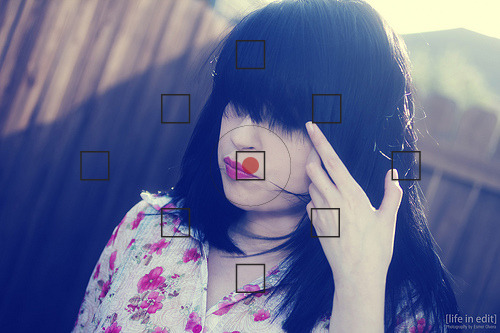
At times the focus points have actually influenced my compositions to a certain degree. Depending on which part of a scene i want in focus, I will tilt the camera so that a selected point falls on the subject. It’s made for some pretty interesting compositions particularly when shooting events .
Leave a Reply